
Transferring a domain name might seem complex. But it’s easier than you think.
Moving your domain name to a new registrar can be a smooth process. You might want to transfer your domain for better pricing, improved services, or a more user-friendly platform. Whatever the reason, knowing the steps can save you time and stress.
This guide will walk you through each step, ensuring your domain transfer goes without a hitch. From unlocking your domain to updating your contact details, we’ll cover it all. Get ready to transfer your domain name with confidence and ease. Let’s dive in and simplify the process!
Preparing For Transfer
Preparing for a domain transfer is crucial to ensure a smooth process. Before you begin, there are several steps to follow. These steps help prevent any hitches during the transfer. Let’s dive into the key preparations required.
Check Domain Eligibility
Before transferring a domain, confirm its eligibility. Domains must be at least 60 days old. They must also be unlocked and in good standing with the current registrar.
| Criteria | Details |
|---|---|
| Domain Age | Must be at least 60 days old |
| Registrar Lock | Must be unlocked |
| Good Standing | No pending disputes or holds |
Unlock The Domain
Unlocking the domain is essential. Locked domains cannot be transferred. Here’s how to unlock your domain:
- Log in to your domain registrar account.
- Navigate to the domain management section.
- Find the lock status of your domain.
- Toggle the lock status to ‘Unlock’.
Once unlocked, the domain is ready for transfer. Ensure you save changes before proceeding.
Backing Up Important Data
Transferring a domain name can be a complex task. One crucial step is backing up important data. Ensuring your data is safe prevents loss during the transfer process. Here’s how to do it effectively.
Export Website Files
Your website files are the core of your online presence. Follow these steps to export your website files:
- Log into your web hosting account.
- Navigate to the file manager.
- Select all files in your web directory.
- Click on the ‘Export’ button or download as a ZIP file.
By exporting your files, you can easily restore them if needed. Keep the backup in a secure location, such as an external drive or cloud storage.
Backup Email Accounts
Email accounts often contain critical information. It is essential to backup email accounts to avoid losing important emails. Here’s how to do it:
- Log into your email client or webmail service.
- Navigate to the settings or options menu.
- Look for the export or backup option.
- Choose the format for the backup (e.g., PST, MBOX).
- Save the backup file to a secure location.
Regular backups of your email accounts protect your communications. This step is vital during domain transfers.
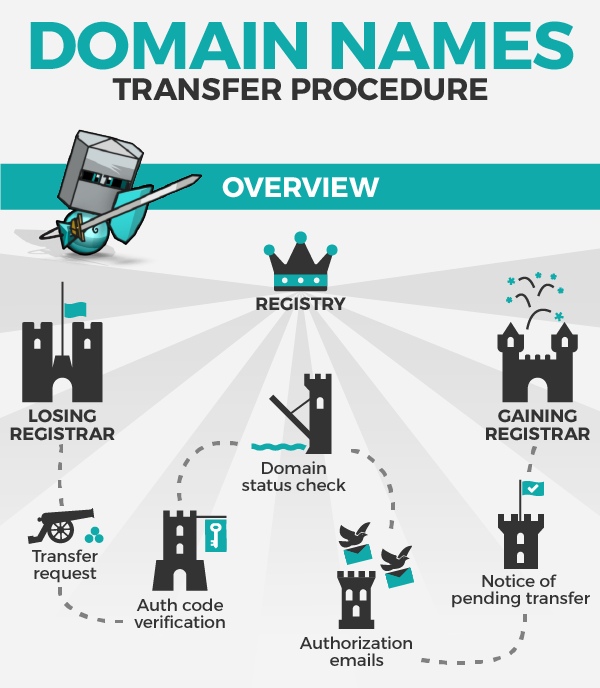
Obtaining Authorization Code
Transferring a domain name involves several steps. One crucial step is obtaining the authorization code. This code is essential for verifying your identity. It ensures only authorized users can transfer the domain.
Requesting The Code
To get the code, log in to your domain registrar account. Search for the domain management or settings section. Find the option to request or generate the authorization code. This option might be labeled “EPP code” or “transfer key.” Click on it. The code will be sent to your registered email address. Check your email and copy the code.
Handling Special Cases
Some domains have extra security measures. You might need to unlock your domain first. Go to the domain settings and look for the lock status. If locked, unlock it to get the code. Also, ensure the domain is not close to expiration. Renew it if necessary. If you face issues, contact your registrar’s support team. They can assist you in obtaining the code.

Credit: odys.global
Initiating The Transfer
Transferring a domain name might seem complicated. But with the right steps, it becomes easy. This section will guide you through initiating the transfer. Follow these simple steps for a successful domain name transfer.
Choosing A New Registrar
First, you need a new registrar. A registrar is a company that manages domain names. Choose a reputable one. Look for good customer service and fair pricing. Read reviews and compare features. Make sure they support the domain extension you own.
Submitting Transfer Request
Once you choose a new registrar, submit a transfer request. This process usually starts on the new registrar’s website. They may ask for your domain name and authorization code. You get the authorization code from your current registrar. Follow the steps provided by the new registrar. Make sure all information is correct. Confirm your email address and other details. The new registrar will handle the rest.
Confirming The Transfer
Once you have initiated a domain name transfer, confirming the transfer is a crucial step. This stage ensures the transfer is proceeding smoothly and that all necessary approvals are in place. Let’s dive into the important steps involved in confirming the transfer.
Verifying Email Confirmation
After starting the transfer, you will receive an email from the new registrar. This email contains a confirmation link or code.
- Open your email inbox and look for an email from the new registrar.
- Check your spam or junk folder if you do not see the email in your inbox.
- Click on the confirmation link provided in the email.
- Follow any additional instructions mentioned in the email.
Make sure to complete this step promptly. Email verification is essential to approve the transfer.
Monitoring Transfer Status
Once you have verified the email, monitor the transfer status. Log in to your new registrar’s account and check for updates.
Here are the steps to monitor the transfer status:
- Log in to your new registrar’s account.
- Navigate to the domain management or transfer section.
- Look for your domain name in the transfer list.
- Check the current status of the transfer.
Common status updates include “Pending,” “In Progress,” or “Completed.” If there are any issues, contact the support team of the new registrar.
By following these steps, you can ensure a smooth and successful domain name transfer. Stay vigilant and keep an eye on your emails and transfer status.
Credit: news.gandi.net
Post-transfer Steps
Once you have successfully transferred your domain name, there are a few crucial steps to follow. These steps ensure that your domain functions correctly and remains secure. Here, we will cover the essential post-transfer steps, including updating DNS settings and renewing your domain.
Updating Dns Settings
After transferring your domain, the first thing to do is update the DNS settings. DNS settings control where your domain points on the internet.
Here’s a step-by-step guide:
- Login to your new domain registrar account.
- Navigate to the DNS management section.
- Update the nameservers to point to your web hosting provider.
- Save the changes.
DNS changes can take up to 48 hours to propagate. During this time, your website may be inaccessible.
Renewing Domain
Make sure to renew your domain to avoid losing it. Once the domain transfer is complete, check its expiration date.
Follow these steps to renew your domain:
- Go to your new domain registrar’s website.
- Login to your account.
- Find the domain you transferred.
- Click on the renewal option.
- Complete the payment process.
Setting up auto-renewal can save you from future hassles. This ensures your domain renews before it expires.
Troubleshooting Common Issues
Transferring a domain name can sometimes be tricky. You might face various issues during the process. Knowing how to handle these common problems can save you time and stress.
Dealing With Transfer Denials
Transfer denials happen for several reasons. Here are some common causes and solutions:
- Domain Lock: Ensure your domain is unlocked. Check your current registrar’s settings.
- Incorrect Authorization Code: Double-check the code provided by your current registrar. It must be accurate.
- Domain Expiration: Make sure your domain is not expired. Renew it if necessary before transferring.
- Administrative Contact Issues: Verify that the administrative contact email is correct. Update it if needed.
Handling Delays
Delays in domain transfer can be frustrating. Here are some tips to handle them:
- Check the Transfer Status: Most registrars provide a status update. Keep an eye on it.
- Contact Support: Reach out to both your current and new registrar. They can provide insights and assistance.
- Allow Time: Domain transfers can take up to seven days. Patience is key.
By understanding and addressing these common issues, you can ensure a smoother domain transfer process.
Credit: nickjanetakis.com
Frequently Asked Questions
How Do I Transfer Ownership Of A Domain Name?
To transfer domain ownership, unlock the domain, obtain the authorization code, initiate the transfer with the new registrar, and confirm via email.
Is It Possible To Transfer A Domain Name?
Yes, you can transfer a domain name. Contact your current registrar to initiate the process. Ensure the domain is unlocked and obtain the authorization code.
How Do I Transfer My Old Domain To A New Domain?
To transfer your old domain to a new domain, update the DNS settings, set up 301 redirects, and inform Google Search Console. Ensure all links point to the new domain. Check for any broken links and fix them.
How Can I Transfer My Domain To Another Provider?
Unlock your domain, get the authorization code, and initiate the transfer with your new provider. Confirm the transfer via email.
Conclusion
Transferring a domain name is straightforward with the right steps. Start by unlocking your domain. Get the authorization code from your current registrar. Then, initiate the transfer with the new registrar. Confirm the transfer through email. Finally, wait for the process to complete.
Follow these steps to ensure a smooth transfer. Remember, patience is key. Your domain will soon be under your control. Happy transferring!


