
Installing plugins in WordPress is a simple process. You can do it in a few steps.
Plugins add new features to your website. They help improve functionality without coding. WordPress plugins are essential tools for any website owner. They extend the capabilities of your site, making it more dynamic and user-friendly. Whether you need to add a contact form, improve SEO, or enhance site security, there’s a plugin for that.
This guide will walk you through the steps of finding, installing, and activating plugins in WordPress. By the end, you will be ready to customize your site with ease. Let’s get started on making your WordPress site even better.
Introduction To WordPress Plugins
WordPress plugins are essential for anyone who wants to add features to their website. They offer a way to expand functionality without needing to code. This guide will help you understand what plugins are and why they are beneficial.
What Are Plugins?
Plugins are small software add-ons. They integrate with your WordPress site. They add new features or improve existing ones. You can find plugins for almost anything. Examples include contact forms, SEO tools, and security enhancements. They are easy to install and manage.
Benefits Of Using Plugins
Plugins enhance your website’s functionality. They save you time and effort. You do not need to code to add new features. Plugins also improve user experience. They help you optimize your site for search engines. Many plugins offer customization options. This allows you to tailor your site to your needs. Some plugins even improve site security. They protect against spam and hacking attempts. Using plugins can make your site more professional and efficient.
Preparing For Plugin Installation
Before adding new plugins to your WordPress site, it’s crucial to prepare properly. This step ensures your site remains secure and functions smoothly. Here are essential steps to take:
Backup Your Website
Backing up your website protects your data. Unexpected issues can arise during plugin installation. To create a backup, follow these steps:
- Navigate to your WordPress dashboard.
- Click on Tools.
- Select Export and download the file.
Alternatively, use a backup plugin like UpdraftPlus or BackupBuddy. These plugins automate the backup process.
Check Plugin Compatibility
Not all plugins work well with every WordPress theme or version. Before installing, check the following:
- Plugin Ratings: Higher ratings often indicate reliability.
- Last Updated: Ensure the plugin is updated regularly.
- Compatible Versions: Verify the plugin works with your WordPress version.
To check compatibility, visit the plugin’s page in the WordPress Plugin Repository. Look for the Tested up to field.
| Aspect | Details |
|---|---|
| Ratings | 4 stars or higher |
| Last Updated | Within the last 6 months |
| Compatible Versions | Matches your WordPress version |
These steps help ensure a smooth plugin installation process. Proper preparation reduces the risk of errors and keeps your site secure.
Installing Plugins From The WordPress Repository
Installing plugins from the WordPress repository is a straightforward process. These plugins enhance your website’s functionality without requiring any coding skills. They are easy to find and install directly from your WordPress dashboard.
Accessing The Plugin Directory
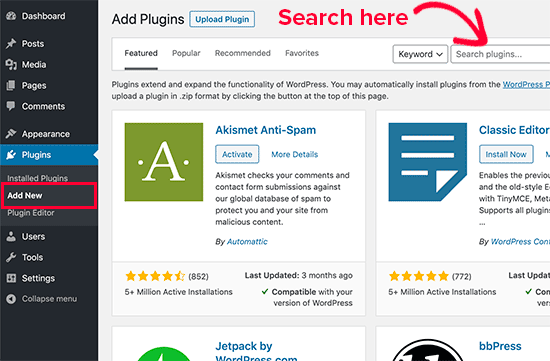
First, log in to your WordPress admin area. From the dashboard, navigate to the “Plugins” section. Click on “Add New” to access the plugin directory. This directory contains thousands of free plugins approved by WordPress.
Search And Install Plugins
In the plugin directory, you will see a search bar. Type in keywords, the plugin name, or functionality you need. A list of plugins matching your search will appear. Each plugin has a brief description, ratings, and number of active installs to help you choose.
Once you find a suitable plugin, click the “Install Now” button. WordPress will download and install the plugin automatically. After installation, click “Activate” to start using the plugin on your site.
Credit: www.wonderplugin.com
Uploading And Installing Custom Plugins
Sometimes, you may need to install custom plugins in WordPress. This process allows you to add unique features to your site. Follow these simple steps to upload and install custom plugins.
Download Plugin Files
First, find the plugin you want to install. This could be from a trusted source or developer. Download the plugin files to your computer. They usually come in a .zip format.
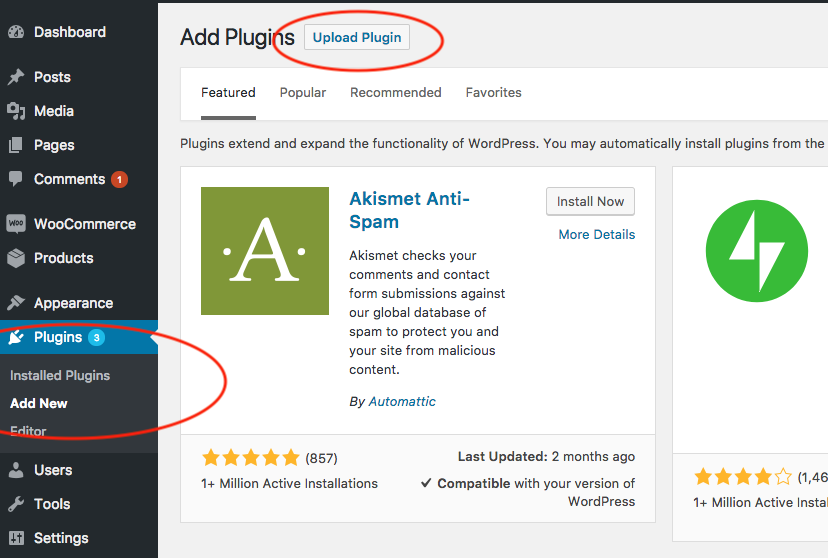
Upload Via WordPress Dashboard
Next, log in to your WordPress dashboard. Navigate to the “Plugins” section on the left-hand menu. Click on “Add New” at the top of the page.
Then, click on the “Upload Plugin” button. This will allow you to upload the .zip file you downloaded earlier. Click on “Choose File” and select the plugin file from your computer.
After selecting the file, click “Install Now”. WordPress will upload and install the plugin. Once the installation is complete, click on “Activate Plugin” to enable it on your site.
Your custom plugin is now active and ready to use. You can configure its settings as needed.
Activating And Configuring Plugins
Once you’ve installed your WordPress plugins, the next step is to activate and configure them. This process is essential to ensure the plugin works as intended. Each plugin may have its own settings, but the basic steps are similar. Let’s dive into the specifics.
Activate Installed Plugins
After installing a plugin, it won’t work until you activate it. Follow these steps to activate your plugin:
- Navigate to your WordPress dashboard.
- Click on Plugins in the left-hand menu.
- Find the plugin you want to activate. It will be listed under Installed Plugins.
- Click the Activate button below the plugin’s name.
Once activated, the plugin will be ready to use. Some plugins might add a new menu item to your dashboard for further configuration.
Basic Configuration Steps
After activation, you may need to configure the plugin settings. Here are the basic steps for configuring a plugin:
- Go to the newly added menu item or back to the Plugins page.
- Click on Settings or the plugin’s name to access its settings page.
- Adjust the settings according to your needs. This may include:
- Entering API keys or authorization details
- Customizing display options
- Setting user permissions
- Click Save Changes to apply the new settings.
Some plugins come with extensive documentation. It’s useful to refer to it for advanced configurations. Always ensure your plugin is compatible with your WordPress version.
Credit: www.elegantthemes.com
Managing Installed Plugins
Managing installed plugins in WordPress is crucial for site performance. Keeping plugins up-to-date, deactivating, or deleting unused ones can help maintain site speed and security. Let’s explore how to manage installed plugins effectively.
Update Plugins
Regular plugin updates are important. They often include security patches, new features, and bug fixes. To update plugins in WordPress:
- Go to the Dashboard.
- Navigate to Plugins and click Installed Plugins.
- Find the plugin with an update notification.
- Click Update Now.
You can also enable automatic updates for plugins. This ensures your plugins stay current without manual intervention.
Deactivate Or Delete Plugins
Deactivating or deleting unused plugins can enhance site speed and security. To deactivate a plugin:
- Go to the Dashboard.
- Navigate to Plugins and click Installed Plugins.
- Find the plugin you want to deactivate.
- Click Deactivate.
To delete a plugin:
- Ensure the plugin is deactivated.
- Click Delete below the plugin name.
- Confirm the deletion.
Removing unused plugins can free up resources. This helps keep your site running smoothly.
Troubleshooting Common Issues
Installing plugins in WordPress can sometimes lead to issues. These issues might disrupt your website’s functionality. In this section, we will look at common problems and how to solve them.
Plugin Conflicts
Plugin conflicts can arise when two plugins do not work well together. This can cause your site to malfunction.
To identify and resolve plugin conflicts, follow these steps:
- Deactivate all your plugins.
- Reactivate each plugin one by one.
- Check your site after activating each plugin.
If the problem returns after activating a specific plugin, you have found the conflict. You may need to find an alternative plugin or contact the plugin developer for support.
Restoring From Backup
If troubleshooting does not fix the issue, you may need to restore your site from a backup. This can save you from losing data.
To restore your site, follow these steps:
- Go to your hosting control panel.
- Find the backup section.
- Choose the backup you want to restore.
- Follow the instructions to complete the restore.
It’s crucial to keep regular backups of your site. This ensures you can quickly recover from any issues.
Credit: www.wpzoom.com
Best Practices For Plugin Management
Managing plugins effectively is crucial for a smooth WordPress experience. Proper plugin management can prevent site issues and improve performance. Follow these best practices to ensure your site runs efficiently.
Limit Plugin Usage
Use only essential plugins on your site. Each plugin adds code and can slow down your website. Too many plugins increase the risk of conflicts and security vulnerabilities. Choose plugins that serve multiple purposes. This reduces the number of plugins you need.
Regular Maintenance
Keep your plugins updated. Updates fix bugs and improve security. Outdated plugins can cause compatibility issues and security risks. Check for updates regularly. Most updates can be done with a single click.
Remove inactive plugins. They can pose security threats even if not in use. Deactivating a plugin is not enough; delete it completely. Regularly review your plugins. Remove any that are no longer necessary.
Frequently Asked Questions
How Do I Add Plugins To My WordPress Site?
To add plugins to your WordPress site, go to the dashboard. Click “Plugins” then “Add New”. Search for your desired plugin, click “Install Now”, and then “Activate”.
How Do I Manually Install WordPress Plugins?
To manually install WordPress plugins, download the plugin zip file. Go to your WordPress dashboard. Navigate to Plugins > Add New > Upload Plugin. Choose the downloaded zip file and click “Install Now. ” Once installed, activate the plugin.
How To Install WordPress Plugins Locally?
To install WordPress plugins locally, download the plugin ZIP file. Go to your WordPress dashboard, click “Plugins,” then “Add New,” and upload the ZIP file. Finally, activate the plugin.
Where Are My Plugins In WordPress?
Find your plugins in WordPress by navigating to the dashboard. Click “Plugins” in the left-hand menu.
Conclusion
Installing plugins in WordPress is simple and essential. Follow each step carefully. Always choose reliable plugins. They improve your site’s functionality. Regularly update your plugins to ensure security. Don’t overload your site with too many plugins. It can slow down performance.
Experiment with different plugins to find the best fit. Remember, a well-chosen plugin can enhance user experience. Keep exploring and learning to make the most of WordPress. Now, you’re ready to boost your website’s capabilities! Happy blogging!


