
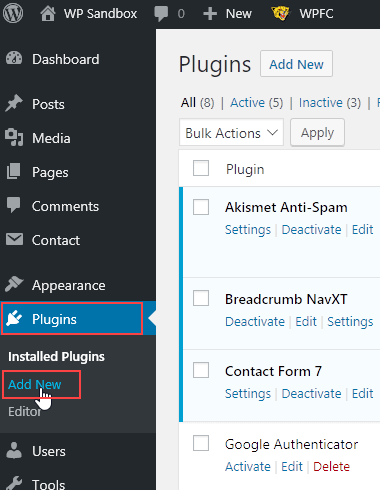
To install security plugins on WordPress, start by accessing your WordPress dashboard. Navigate to ‘Plugins,’ then click ‘Add New.’
Search for the desired plugin, install, and activate it. Securing your WordPress site is essential. With hackers always on the lookout, adding security plugins can safeguard your data. But how do you go about installing these plugins? The process might seem daunting at first, but it’s simpler than you think.
In this guide, we will walk you through each step to ensure your WordPress site is protected. You will learn how to find, install, and activate security plugins efficiently. Let’s get started on making your website more secure.

Credit: hidemywpghost.com
Choosing The Right Security Plugins
Choosing the right security plugins for your WordPress site is crucial. The right plugin can protect your site from hackers and malware. But how do you choose the best one? Let’s break it down.
Evaluate Your Needs
First, understand what your site needs. Do you need protection from spam? Are you worried about brute force attacks? Each site has different needs.
Make a list of your top security concerns. This helps you find the right plugin. Some plugins offer comprehensive protection. Others focus on specific threats. Choose based on your list of needs.
Top Recommended Plugins
Here are some top recommended security plugins. These are popular and highly rated.
| Plugin Name | Features | Free/Paid |
|---|---|---|
| Wordfence | Firewall, malware scan, live traffic | Free & Paid |
| Sucuri | Malware scan, DDoS protection, security audits | Paid |
| iThemes Security | Brute force protection, 2FA, database backups | Free & Paid |
| All In One WP Security | Login lockdown, firewall, spam protection | Free |
These plugins offer different features. Wordfence is popular for its firewall and live traffic feature. Sucuri is known for its strong DDoS protection. iThemes Security offers a range of features including two-factor authentication. All In One WP Security is a great free option.
Choose a plugin that matches your list of needs. Install it and keep your site secure.

Credit: cleantalk.org
Preparing Your WordPress Site
Before installing security plugins on your WordPress site, take some crucial steps to prepare. Proper preparation ensures a smooth installation process and helps prevent potential issues. Two key steps in this process are backing up your website and updating the WordPress core.
Backup Your Website
Backing up your website is essential. It protects your data from loss. If something goes wrong, you can restore your site. Use a reliable backup plugin. Some popular options are UpdraftPlus and BackWPup. These plugins are user-friendly and effective. They allow you to schedule regular backups. Store these backups on a remote location. Options include cloud storage or an external drive. This ensures your data is safe and accessible.
Update WordPress Core
Keeping your WordPress core updated is vital. Updates often include security patches. These patches fix vulnerabilities. Running an outdated version is risky. Hackers exploit known weaknesses. To update, go to your WordPress dashboard. Click on “Updates.” If an update is available, follow the prompts. Ensure compatibility with your themes and plugins. Check their respective update logs. Updating regularly keeps your site secure and efficient.
Installing Security Plugins
Security plugins are essential for protecting your WordPress site. They help guard against hackers, malware, and other threats. Installing these plugins is a simple process, even for beginners.
Accessing The Plugin Directory
First, log into your WordPress dashboard. On the left-hand menu, find and click on “Plugins”. This will take you to the Plugin Directory. Here, you can manage all your installed plugins.
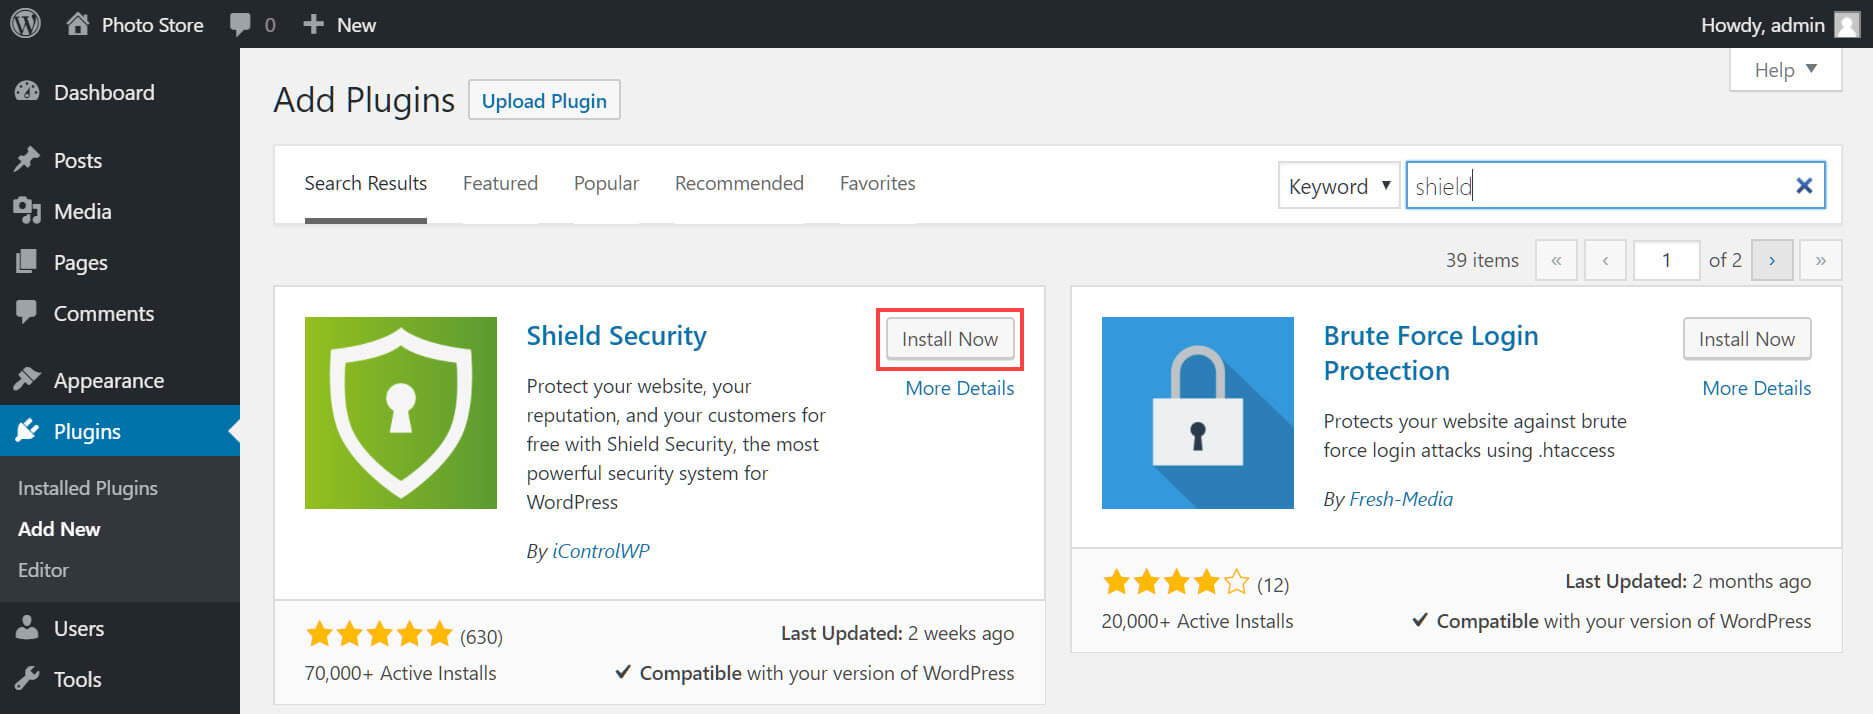
Searching For Plugins
Next, you need to find the security plugin you want. In the Plugin Directory, there is a search bar. Type in keywords like “security” or the name of a specific plugin. A list of relevant plugins will appear. Look for those with high ratings and good reviews.
Click on the plugin name to read more about it. Check the plugin’s details, such as last update date and compatibility with your WordPress version. Once satisfied, click the “Install Now” button. WordPress will download and install the plugin for you.
After installation, click the “Activate” button. Your security plugin is now active and ready to use. Follow the plugin’s setup instructions to configure it according to your needs.
Configuring Plugin Settings
Configuring plugin settings is crucial for ensuring your WordPress site remains secure. After installing a security plugin, you need to adjust its settings. This will tailor the plugin to your site’s specific needs.
Basic Configuration
Start with the basic settings. These are usually found in the plugin’s main menu. Look for options like ‘Enable’ or ‘Activate.’ Ensure that the plugin is turned on. Next, check for any default settings. Adjust them to fit your site’s security needs. For example, enable firewall protection. This helps block unwanted traffic. Also, turn on malware scanning. This will help detect any harmful files.
Advanced Settings
Once the basics are set, move on to the advanced settings. These options provide more control. You might see options for brute force attack protection. Turn this on to prevent multiple login attempts. Another important setting is two-factor authentication. This adds an extra layer of security. You can also configure file change detection. This alerts you to any unauthorized changes.
Take your time with these settings. Each option enhances your site’s security. Make sure to save your changes before exiting the plugin menu.
Running Initial Security Scans
Running initial security scans is vital for securing your WordPress site. These scans detect vulnerabilities that could threaten your website. They provide a comprehensive look at your site’s health, ensuring it is safe from potential threats. Let’s dive into performing and reviewing these scans.
Performing A Full Scan
Start by navigating to your security plugin dashboard. Look for the option to perform a full scan. This scan will check your entire site for security issues. It may take a few minutes to complete. Be patient. This step is crucial for identifying hidden threats.
During the scan, the plugin will search for malware, outdated software, and weak passwords. It will also check your site’s files and databases. Make sure you do not interrupt the process. Allow the scan to finish to get accurate results.
Reviewing Scan Results
Once the scan finishes, review the results carefully. The plugin will provide a detailed report of any issues found. Look for critical vulnerabilities first. These need immediate attention. Common issues include outdated plugins, themes, and weak passwords.
The report may also suggest actions to fix these issues. Follow the recommendations provided by the plugin. Addressing these problems promptly will enhance your site’s security. If you are unsure about any results, seek advice from a security expert.
Setting Up Regular Scans
Regular scans are essential for maintaining the security of your WordPress site. They help detect vulnerabilities, malware, and other security threats. Setting up regular scans ensures your site stays safe and secure.
Scheduling Scans
To schedule scans, follow these steps:
- Go to your WordPress dashboard.
- Navigate to the security plugin settings.
- Find the Scan Schedule option.
- Select the frequency of the scans (daily, weekly, or monthly).
- Save your settings.
Regular scans help catch threats early. Choose a frequency based on your site’s needs.
Automating Scan Reports
Automating scan reports keeps you informed about your site’s security status. Here’s how to set it up:
- Go to the security plugin settings in your dashboard.
- Locate the Automated Reports section.
- Enter your email address to receive reports.
- Choose the frequency of the reports (daily, weekly, or monthly).
- Save your settings.
With automated reports, you get updates without manually checking the plugin. This feature ensures you stay aware of any potential issues.
Maintaining Plugin Updates
Maintaining plugin updates on WordPress is crucial for your site’s security. Outdated plugins can expose your site to risks. Keeping plugins updated ensures they work well with the latest WordPress version.
Updating plugins also means you get new features and bug fixes. This helps your site run smoothly. Below are important aspects of maintaining plugin updates.
Updating Plugins Regularly
Regular updates are essential. Check for updates at least once a week. To do this, log in to your WordPress dashboard. Go to the “Plugins” section. You will see a list of installed plugins.
If there is an update, you will see a notification. Click on “Update Now” to install the latest version. This process is quick and keeps your site secure.
Handling Update Conflicts
Sometimes, updates can cause conflicts. This can break your site. Before updating, create a backup of your site. Use a backup plugin for this. If an update causes issues, you can restore the backup.
If you experience problems, deactivate the conflicting plugin. Check if your site works again. You can also contact the plugin’s support team for help. They often have solutions for these issues.
Maintaining plugin updates is not hard. It just needs regular attention. By following these steps, you can keep your WordPress site safe and efficient.
Monitoring Security Alerts
Once you have installed security plugins on your WordPress site, monitoring security alerts is crucial. Security alerts help you stay informed about potential threats and vulnerabilities. By setting up and responding to alerts, you can ensure the safety of your website.
Setting Up Alerts
To start monitoring, you need to set up alerts. Most security plugins offer customizable alert settings. Follow these steps:
- Go to the plugin’s settings page.
- Find the alert or notification section.
- Choose the types of alerts you want to receive.
- Enter your email or preferred contact method.
- Save your settings.
Common alert types include:
- Unauthorized login attempts
- Malware detection
- File changes
- Plugin vulnerabilities
Responding To Alerts
Once alerts are set up, it’s important to respond promptly. Each alert type requires a different response:
| Alert Type | Response |
|---|---|
| Unauthorized login attempts | Check login logs and reset passwords if needed. |
| Malware detection | Run a full scan and remove any detected malware. |
| File changes | Verify the changes and restore any altered files. |
| Plugin vulnerabilities | Update or replace vulnerable plugins immediately. |
Ignoring alerts can lead to significant security issues. Regularly check your alerts and take appropriate actions to keep your WordPress site secure.
Credit: www.hostpapa.com
Frequently Asked Questions
How To Add Plugin Security In WordPress?
To add plugin security in WordPress, install reputable plugins, regularly update them, and use a security plugin like Wordfence. Keep WordPress and themes updated. Use strong passwords and implement two-factor authentication.
How Do I Add Security To A WordPress Website?
Add security plugins like Wordfence or Sucuri. Use strong passwords. Enable two-factor authentication. Keep WordPress and plugins updated. Regularly back up your website.
How To Activate Security Plugin?
To activate the security plugin, first install it from the plugin repository. Then, go to the plugin settings and click “Activate”. Follow the setup instructions to configure the plugin for optimal security.
Which Plugin Is Used For Security In WordPress?
The Wordfence Security plugin is widely used for WordPress security. It offers firewall protection, malware scanning, and more.
Conclusion
Installing security plugins on WordPress is essential for website protection. Follow the steps outlined to safeguard your site. Choose reliable plugins, ensure they are updated, and monitor their performance. Regular checks and updates keep your site secure. Always prioritize your site’s security to prevent potential threats.
With these tips, you can manage WordPress security easily. Protect your site, and enjoy peace of mind.


