
Setting up a web hosting account is the first step to getting your website online. It may seem complicated, but it’s easier than you think.
Whether you’re starting a blog, an online store, or a personal website, having a web hosting account is essential. It stores your website’s data and makes it accessible to users worldwide. This guide will walk you through the process, making it simple and straightforward.
We will cover everything from choosing the right hosting provider to setting up your account. By the end, you’ll have a clear understanding and the confidence to get your website up and running. Ready to start your journey? Let’s dive in.

Credit: www.wikihow.tech
Choosing The Right Web Hosting Provider
Setting up a web hosting account is the first step to getting your website online. Choosing the right web hosting provider is crucial. It affects your site’s performance, security, and reliability. Below, we’ll break down what you need to know to make an informed decision.
Types Of Web Hosting
There are different types of web hosting to suit various needs. Here are the most common options:
- Shared Hosting: Multiple sites share the same server. It’s cost-effective but can be slow.
- VPS Hosting: Virtual Private Server hosting offers more resources and better performance. Ideal for medium-sized websites.
- Dedicated Hosting: You get an entire server to yourself. It’s expensive but provides top-notch performance.
- Cloud Hosting: Resources are spread across multiple servers. It offers high scalability and reliability.
- Managed WordPress Hosting: Specifically optimized for WordPress sites. Includes automatic updates and backups.
Factors To Consider
When selecting a web hosting provider, consider the following factors:
- Uptime Guarantee: Aim for at least 99.9% uptime. This ensures your site is available most of the time.
- Speed: Fast loading times are essential. They improve user experience and SEO.
- Customer Support: Look for 24/7 support. It’s crucial for resolving issues quickly.
- Security Features: Ensure the host provides SSL certificates, firewalls, and malware protection.
- Scalability: Choose a host that can grow with your site. This prevents future migration hassles.
- Pricing: Compare plans and pricing. Ensure it fits your budget without compromising quality.
Below is a table summarizing the key factors to consider:
| Factor | Importance |
|---|---|
| Uptime Guarantee | High |
| Speed | High |
| Customer Support | High |
| Security Features | High |
| Scalability | Medium |
| Pricing | Medium |
By carefully evaluating these factors, you can choose the best web hosting provider for your needs. This sets a strong foundation for your website’s success.
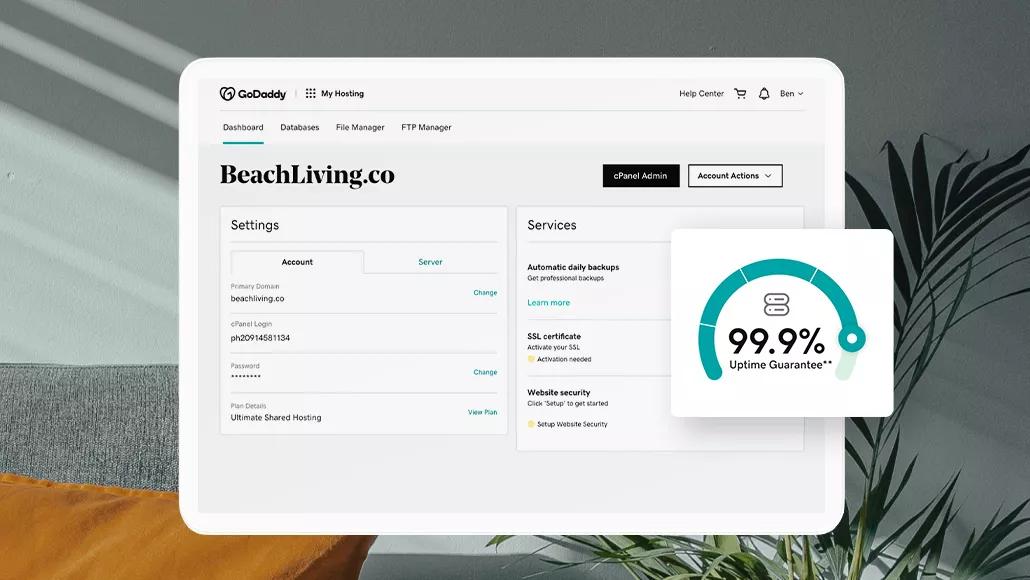
Credit: www.godaddy.com
Registering A Domain Name
Registering a domain name is the first step in setting up your web hosting account. Your domain name is your website’s address on the internet. It should be easy to remember and relevant to your content. Let’s dive into the details of selecting a domain name and using domain registrars.
Selecting A Domain Name
Choosing the right domain name is crucial. It represents your brand and affects your site’s visibility. Here are some tips for selecting a domain name:
- Keep it short and simple: Shorter names are easier to remember.
- Make it relevant: The name should reflect your website’s content or purpose.
- Avoid numbers and hyphens: These can be confusing and hard to remember.
- Use keywords: Including keywords can improve your search engine ranking.
- Check availability: Ensure the name you want is not already taken.
Using Domain Registrars
Once you have selected your domain name, you need to register it through a domain registrar. A domain registrar is a company that manages the reservation of internet domain names. Here are the steps to register your domain name:
- Choose a domain registrar: Some popular registrars include GoDaddy, Namecheap, and Google Domains.
- Search for your domain name: Use the registrar’s search tool to check if your desired name is available.
- Select your domain extension: Common extensions include .com, .net, .org, etc. Choose one that suits your needs.
- Provide your contact information: Registrars require your name, address, phone number, and email.
- Complete the registration: Pay the registration fee to secure your domain name.
After registering your domain name, you can link it to your web hosting account. This will make your website accessible on the internet.
Setting Up Your Hosting Account
Setting up your hosting account is the first step to getting your website online. This process involves a few essential steps. By following these steps, you can ensure your website runs smoothly and effectively.
Creating An Account
The first step is creating an account with your chosen web hosting provider. Here’s how to do it:
- Visit the web hosting provider’s website.
- Click on the Sign Up or Get Started button.
- Fill in your personal details like name, email, and address.
- Choose a hosting plan that fits your needs.
- Enter your payment information to complete the registration.
Once you complete these steps, you will receive a confirmation email. This email will contain your login details and further instructions.
Configuring Account Settings
After creating your account, you need to configure your account settings. This ensures your hosting account is set up correctly.
- Login to your account using the details provided in the confirmation email.
- Navigate to the Account Settings section.
- Update your contact information and password if necessary.
- Set up your billing information to ensure uninterrupted service.
- Choose your domain name or link an existing one.
These settings are crucial for the proper functioning of your website. Make sure all information is accurate and up-to-date.
Following these steps will help you set up your hosting account efficiently. This will pave the way for a successful website launch.
Navigating The Control Panel
Setting up a web hosting account can seem daunting. The control panel is your main tool. It helps manage your website. Understanding it can make your task easier.
Understanding The Dashboard
The dashboard is the first thing you see. It gives a summary of your account. You can find links to all main features here. It shows your resource usage. This includes storage, bandwidth, and email accounts.
Common Features And Tools
Most control panels offer similar features. File Manager lets you upload and manage files. You can create and delete files. You can also change permissions.
Another common tool is the Email Manager. It helps you set up and manage email accounts. You can create new email addresses. You can also set up forwarding and auto-responders.
Databases are another key feature. The control panel lets you create and manage databases. You can use tools like phpMyAdmin. This helps you manage your database content.
Many control panels include a one-click installer. This tool makes installing software easy. You can install WordPress, Joomla, and other apps with one click.
Uploading Website Files
After setting up your web hosting account, the next step is uploading your website files. This process makes your website accessible to visitors. There are two primary methods for uploading files: using FTP and the file manager. Both methods have their benefits and can be used based on your preferences and needs.
Using Ftp
FTP, or File Transfer Protocol, is a popular method for uploading website files. It requires an FTP client such as FileZilla. Here’s a step-by-step guide:
- Download and install FileZilla from the official website.
- Open FileZilla and enter your FTP credentials. These are usually provided by your hosting provider.
- Connect to your server by clicking the “Quickconnect” button.
- Navigate to the folder where your website files are stored on your computer.
- Select the files you want to upload.
- Drag and drop the selected files into the desired directory on your server.
Using FTP is efficient for uploading multiple files and large-sized files. It also allows you to manage your files conveniently.
File Manager Options
The file manager is another option for uploading website files. This tool is available in your hosting control panel. Here’s how to use it:
- Log in to your hosting control panel.
- Navigate to the file manager section.
- Open the directory where you want to upload your files.
- Click the “Upload” button.
- Select the files from your computer.
- Upload the files and wait for the process to complete.
The file manager is user-friendly and suitable for quick uploads. It’s also ideal for managing files directly from your browser.
Both FTP and file manager options are essential tools for uploading and managing your website files. Choose the method that best suits your needs and preferences.

Credit: www.youtube.com
Configuring Dns Settings
Once you have chosen a web hosting provider and registered your domain, the next step is configuring DNS settings. DNS settings are crucial for ensuring your domain name directs visitors to your website. This section will guide you through updating name servers and understanding DNS propagation.
Updating Name Servers
First, you need to update your domain’s name servers. Name servers are part of the Domain Name System (DNS) and help translate your domain name into an IP address, which browsers use to load your website. Follow these steps:
- Log in to your domain registrar’s website.
- Navigate to the DNS settings or domain management area.
- Locate the section labeled “Name Servers” or “DNS Servers.”
- Replace the existing name servers with the ones provided by your web hosting provider.
- Save the changes.
Here is an example of what the name servers might look like:
| Type | Name Server |
|---|---|
| Primary | ns1.yourhostingprovider.com |
| Secondary | ns2.yourhostingprovider.com |
After updating the name servers, your domain will start pointing to your new web hosting account.
Dns Propagation
DNS propagation refers to the time it takes for DNS changes to spread across the internet. This process can take up to 48 hours, though it usually happens within a few hours. During this time, some users may still see the old website or get an error message.
To check the status of DNS propagation, you can use online tools like What’s My DNS or DNS Checker. Enter your domain name, and these tools will show the current DNS records from various locations worldwide.
While waiting for DNS propagation to complete, avoid making further DNS changes. Each change resets the propagation process.
Patience is key during this stage. Once propagation is complete, your domain will be fully functional and point to your new web hosting account.
Installing A Content Management System
Setting up a web hosting account is just the beginning. Installing a Content Management System (CMS) is crucial for managing your website’s content. A CMS makes it easy to create, edit, and organize your website’s content without technical skills.
Popular Cms Options
There are several CMS options available. Each has its own strengths and weaknesses. Here are some popular choices:
- WordPress: The most popular CMS. It’s user-friendly and highly customizable.
- Joomla: Great for building complex websites. It offers flexible options.
- Drupal: Known for its robustness and security. Ideal for large websites.
- Magento: Best for e-commerce sites. It offers powerful tools for online stores.
One-click Installations
Many web hosts offer one-click installations for popular CMS options. This makes the setup process quick and easy. Follow these steps to install a CMS using one-click installations:
- Log in to your web hosting account.
- Navigate to the control panel, often called cPanel or Plesk.
- Look for the one-click installer section.
- Select your preferred CMS from the list.
- Click the install button and follow the prompts.
After installation, you can access your new CMS by logging in with the credentials you set up. This will take you to the CMS dashboard, where you can start creating content for your website.
Testing Your Website
After setting up your web hosting account, it’s crucial to test your website. This ensures that everything works as expected. Testing helps you identify issues before your visitors do. This section will guide you through the steps of checking for errors and ensuring site functionality.
Checking For Errors
First, you need to look for any errors on your website. Errors can affect user experience and search engine ranking. Here are some steps to follow:
- Use a browser to visit each page of your website.
- Check for broken links. These are links that lead to nowhere.
- Look for missing images. Ensure all images load correctly.
- Review your content for spelling and grammar mistakes.
Using online tools can help you find errors quickly. Tools like Google Search Console and W3C Validator are very useful. They provide detailed reports on issues found on your site.
Ensuring Site Functionality
Your website must function well for all users. This includes checking forms, buttons, and interactive elements. Follow these steps to ensure everything works:
- Test all forms. Submit each form to ensure it works.
- Check buttons and links. Make sure they lead to the correct pages.
- Ensure interactive elements like sliders and menus work properly.
- Verify that your website is mobile-friendly. Use your phone to check the site.
Testing your website on different browsers is also important. Popular browsers include Chrome, Firefox, and Safari. This ensures your site looks good for all users.
Remember, a well-tested website provides a better user experience. It also improves your site’s performance in search engines. Take the time to test thoroughly.
Frequently Asked Questions
How To Create A Web Hosting Account?
Sign up with a web hosting provider. Choose a plan that fits your needs. Register a domain name. Complete the payment process. Access your hosting account through the provider’s control panel.
How Do I Create A Host Account?
Sign up on the hosting platform. Complete the registration form. Verify your email address. Set up your profile. Start listing your property.
What Is A Website Hosting Account?
A website hosting account stores your website’s files on a server, making it accessible online. It includes resources like storage, bandwidth, and email accounts. Reliable hosting ensures your site runs smoothly and remains accessible to visitors.
How Much Does A Hosting Account Cost?
Hosting account costs vary widely. Basic plans start at $2. 95 per month, while premium options can exceed $30 monthly.
Conclusion
Setting up a web hosting account is easier than it seems. Follow the steps, and you will have your website online quickly. First, choose a reliable hosting provider. Next, select a plan that fits your needs. Then, register your domain name.
After that, set up your account and configure your settings. Finally, upload your website files. With these steps, you can create a strong online presence. Remember, practice makes perfect. Keep learning and improving. Happy hosting!


